March 13, 2010

Quick Shave

If you recall in the previous post, the Corbeau FX1 Pro seats are much too high, especially with the seat padding in. Big ups to Dan from Assaultech for contacting Corbeau for me on this trick here. Apparently you can remove the rear feet from the seats for better fitment/extra headroom. Corbeau specified to remove the rear feet only, and to remove up to 3/4'. Thing is, 3/4' is pretty much the entire rear foot, measured from the smallest point of the foot. Big ups to Shane for his lumber jacking of the feet all night. We used a six inch hack saw to cut them off, while using a filer to round off any edges if need be. If we were to do it again though... Shane says Reciprocating saw or a sawsall.

If you are doing this mod yourself to your own set of Corbeau FX1 Pro seats, take a look around the seat for the smaller bolts that allow you to side mount the seat. I used those smaller bolts for the rear pegs, as the normal bolts would protrude the bottom of the seat, and would be quite hard to sit down or even use the cushion.

Once we did this modification, the seats were a perfect height. Without the cushions, I sat a touch lower than stock, while with the cushions I sat just a touch higher than stock. I will still need to take out the seat cushions to fit my helmet perfectly, but I can have them in and be comfortable while driving on the street. honestly, I wish the seats came from Corbeau with this height difference as the seat feels much more comfortable with the slight lean, cradling the driver comfortably, along with the extra headroom is always a plus.

Some quick pictures of the cutting in action.

March 11, 2010

Liberty Mazda Visit

The weather outside has been getting much warmer now thankfully, so I decided to take advantage of that and take the car to Liberty Mazda and get some needed things taken care of. As usual, they were more than helpful and couldn't have done a better job at what I needed.

For starters, they saved a unfinished bodywork job on my trunk and bumper. The results were better than expected, and I wish I just went to them from the start. The trunk is now wingless, and the holes for the badges that I plugged before and the holes for the wing are welded up, all with fresh new paint. Bumper had gotten a little scraped up and badly chipped from all my highway miles, so it needed a repainting for sure.

For maintenance goodies, I got my transmission fluid changed, my differential fluid changed, state inspection, engine compression test, and my new REmedy Oil Pressure Regulator upgrade. Everything went smoothly, big ups to Mike and Tom for their hard work in making sure I'm taken care of. For those who are wondering of the results of my compression test, I think Ray of BHR had said it best,"Dude! Your engine is backwards!"

Front rotor at 250 RPM came out to an average of 8.2. The three runs were 8.6, 7.9, and then 8.1. The rear rotor at 227 RPM came out to an average of 8.6. The three runs were 8.4, 8.6, and 8.9. Most rebuilt engines see high 9 numbers. It's interesting as usually most rotary engines have the rear rotors start failing first, seeing lower compression there instead of the front as the rear rotor runs hotter than the front. But surprisingly with all I have been doing, my 2004 engine with 52,000 miles is running quite strong. No complaints here!

Here are some more pictures of the debadged and dewinged trunk.

March 3, 2010

Odyssey P680 Battery Mounted

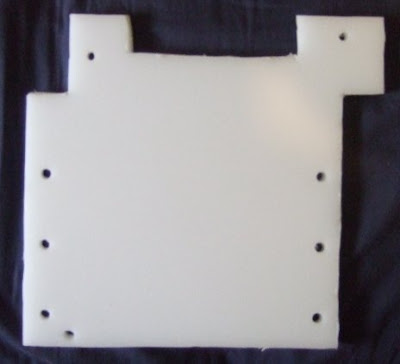
We mounted the Odyssey PC-680 battery when in down time from the other projects going on. This became a bit of a pain at times as there was no real DIY written up for this surprisingly. I have seen many similar "builds" to this, but no real writeup. Looks like I'll be changing that here! Below is a picture of the measurements needed for the firewall mount, which is what your battery mount will mount to.It's pretty straight forward. We used a half inch thick cutting board we picked up from Shaws, got the biggest size we could get. Cut the plastic cutting board with the dremel with the following measurements. The opening I cut at the top is because of the strut bar I have. Measure where you want your battery mount to be and bolt up to the plastic board and drill your holes accordingly. Oleg decided to try out T Nuts for the backing of the plastic and that idea worked out great for us. I also spray painted the mount black after I was done just to clean it up a bit.Didn't want to go into too much details on the DIY with this one as we had to feel out a lot of the steps we did and I have a feeling someone out there can maybe do better with just the pictures and comments I have listed here. Pretty straight forward for the most part though, just time consuming.

March 2, 2010

Corbeau FX1 Pro

Installed these the other day. Double big ups to Jordan for dealing with my mistake and making this project turn from an hour project into almost a four hour project. Remember when installing these seats to NOT bolt down the harnesses first and then thread them through the seats..it won't fit. Thread them first and then bolt. I learned the hard way.Anyways, here are the seats. They look great, feel awesome...just the fact that I can't drive them with the seat cushion. My head just barely touches the roof with the seat cushions in, I wouldn't be able to fit my helmet if I tried. It was worth it for the most part though as it was a 35~lb. savings. The other issue with swapping out to racing seats is that the airbag light on the dash is always on.

Modified AEM Intake

Looks like the winter project has come to an end finally! This post and a few following are some of the stuff that was done while the car was sleeping for the winter. Shouldn't be too much of a surprise as I can't really keep it quiet what I had planned! Want to give a big ups to everyone that helped me with all of the projects as they busted their asses helping me out. Oleg, James, Jordan, Shane, Dan and Lou. Good times everyone.

I had purchased the AEM Intake for the car as I had read some great write-up done by Eric Meyer about the best intake to match his exhaust build (which is very similar to what I will be building for an exhaust soon). Apparently the AEM/Mazdaspeed intake setup, but modified with a single 90' degree bend instead of two, seems to make the most overall power and torque. This is very desirable as I need more push when it comes to autocross, especially in 2nd gear.

We installed the AEM intake the standard way as listed in it's instructions (kind of a no brainer, no need for a writeup), just make sure that the piping is as straight and flush as possible as that can cause problems for the air if it's not. Once we had it all in, we verified the filter could fit on the piping if we made a cut on it or not (which it can!). After a few dremel disks and some WD40 to lubricate the cutting, Oleg pulled it off nice and smooth.

We washed off all the metal shards from the pipe, because you really don't want that stuff going into your engine, and then installed the piping, followed by the filter. The results is seen in the pictures here, and it looks pretty aggressive. The filter just lightly sits on the plastic undertray, luckily not too much that it pushes it down. I can't wait to test out it out at the start of the season and see just how much it will help, especially when paired with my upcoming exhaust build. The sound it makes when revving is interesting as I swear I could hear the engine coming straight from the intake filter and not the actual engine or even exhaust.

I'll be heat wrapping this at some point so it doesn't get too hot with the engine temperatures. Also, for the water sock for the filter, I plan to keep that on for the most part except dry events. No need to have it off on the streets really.